Main Window
HandPunch Admin consists of 2 main sections:
- Connection settings – this is where you would choose type of connection and settings to connect to your HandPunch.
- Device Details – this is where you would see setting of your device depending on the tab you choose.
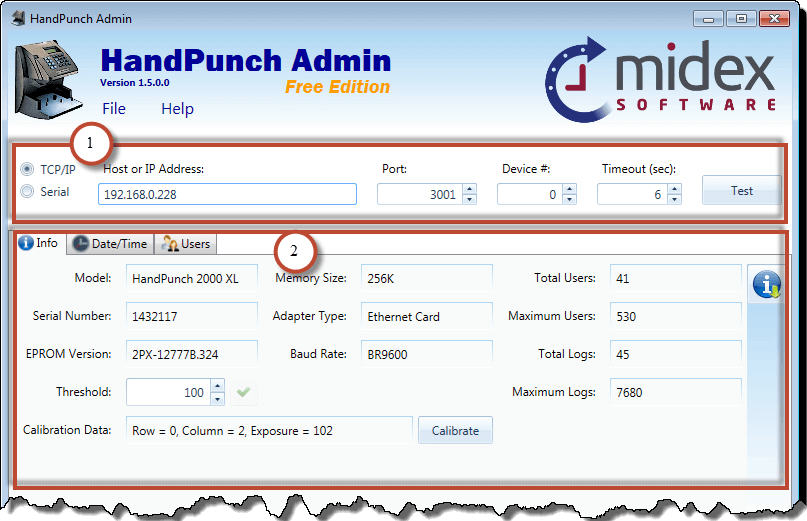
Connection Settings
You can connect to your HandPunch using TCP/IP connection or Serial Connection.

- Connection Type – select the type of connection you are using
- Connection Settings – enter connection settings
- Test button – use this button to test if you are able to connect to HandPunch with the setting you have provided
Connecting to HandPunch via TCP/IP
If you would like to connect to HandPunch using network connection, then you need to specify IP or Host address, Port and Device Number.

- Host or IP Address – If your HandPunch is on a Local Area Network, then you need to enter its IP address into “Host or IP Address field”. If you are connecting to the HandPunch which is located in a remote location, then you need to know either a static IP of the location where the HandPunch is or host address. You can read our How To topic “How to connect to HandPunch from a remote location“.
- Port – If your HandPunch is on a Local Area Network, then you should leave Port number to its default value 3001. If your HandPunch is in the remote location, then you need to know the port number that was forwarded in the router to the HandPunch you are trying to connect to. You can read our How To topic “How to connect to HandPunch from a remote location“.
- Device Number – If your HandPunch has a built-in network card, then device number should be 0. If you are using Serial to TCP/IP converter, then you need to know the address assigned to your HandPunch. You can read our How To topic “How to change HandPunch address“.
- Timeout – This is a connection timeout. Default value is 6. But if you are not able to connect to your HandPunch because the connection is too slow, you may increase it. If you have a lot of users in the HandPunch, sometimes it is necessary to increase this timeout when you download them.
Connect to HandPunch via Serial
If you would like to connect to HandPunch using Serial Cable, then you need to specify COM Port, Baud Rate and Device Number.
- COM Port – COM port on your computer where serial cable from HandPunch is connected
- Baud Rate – baud set in the HandPunch. Default Baud Rate on HandPunch is 9600. Unless you know that is has been changed, you should leave it at 9600.
- Device Number – Address assigned to your HandPunch. You can read our How To topic “How to change HandPunch address”.
- Timeout – This is a connection timeout. Default value is 6. But if you are not able to connect to your HandPunch because the connection is too slow, you may increase it. If you have a lot of users in the HandPunch, sometimes it is necessary to increase this timeout when you download them.
Info Tab
In this window you can view some parameters about your HandPunch. You can change default Threshold value and you can calibrate your HandPunch.
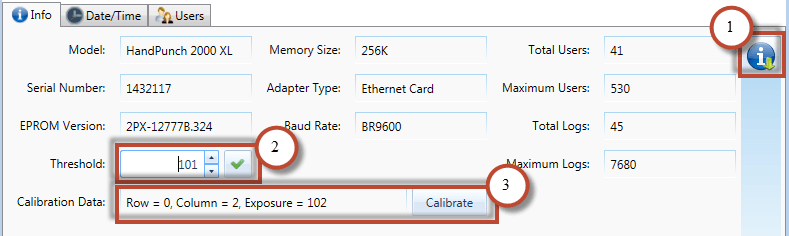
- Download Info button – you have to press this button to pull all information from your HandPunch
- Threshold – HandPunch threshold value. This is the value used when user have threshold value set to 0. You can change the value and click on the button beside it to upload this new value the reader.
- Calibration Data – Current calibration data in your HandPunch. Row and Column values should be between -2 and 2. If values in your HandPunch exceed these values, it might be an indication that the reader is not functioning properly. Exposure value is the camera exposure of your HandPunch. On newer models of HandPunch, where EPROM version is 296 or greater, the Exposure value is the same as it shows in the HandPunch menu. Generally, this value should be between 90 and 120. It can go up to 130 if the room has poor light conditions. In the older readers, Exposure value would be different from the E value if you look at calibration settings through HandPunch menu. The reason is because in the HandPunch reader you see a percentage of current Exposure value comparing to the default value that is set when your HandPunch was tested at the factory and this default value varies in each reader.
Other Information
- Model – Model of your HandPunch
- Serial Number – Serial Number of your HandPunch. It should match the number on the back of the reader.
- EPROM Version – Version of the EPROM chip on the HandPunch board
- Memory Size – Memory size in your HandPunch.
- Adapter Type – Type of connection your device has. If you are connecting using network option, but you see serial connection in this field, it means that you are using Serial to TCP/IP adapter and you HandPunch does not actually has built-in network card.
- Baud Rate – Baud rate set in your HandPunch.
- Total Users – Total number you users you have in your device.
- Maximum Users – Maximum number of users your device supports.
- Total Logs – Number of logs currently in your device.
- Maximum Logs – Maximum number of logs your device supports.
- Calibrate button – Sends command to your HandPunch to begin calibration. You should only calibrate your HandPunch if it often does not recognize your employees or you have just cleaned the device. After you calibrate device, we compare new Exposure value to the one before calibration. If value has changed by more than 20% you will get a warning. One of the main reasons why value may change so much, is if someone obstructed the HandPunch camera by putting something on the plate (i.e. hand). You should make sure that there is no one using HandPunch when you are calibrating it.
Date /Time Tab
After you connect to HandPunch reader, program automatically reads current date and time set in the HandPunch. We then simulate the time change without reading these values from the reader.
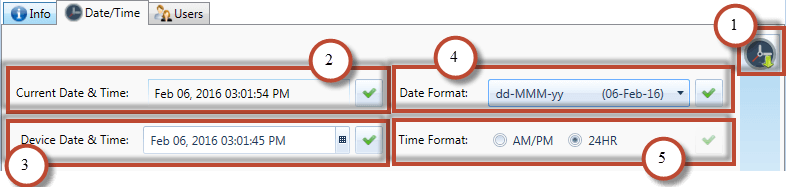
- Download Date & Time Info button – to see what date and time setting in the HandPunch, you have to press this button to download it
- Current Date & Time – show current date and time from the computer where you are running HandPunch Admin. Press button beside it will upload your current system date and time to the HandPunch
- Device Time & Date – Time and Date on the HandPunch. After each time these values are read from the reader, we simulate the change in date and time without pulling new values every second. If you want to set date and time different from your computer’s date and time, set it to whatever time you would like and press set button beside it.
- Date Format –Date format displayed on the HandPunch screen. You can change it to a different format and press set button beside it to send changed to your HandPunch
- Time Format – Time format displayed on the HandPunch screen,. You can choose between AM/PM or 24HR format. If you change it, you have to press set button beside it to send changed to your HandPunch.
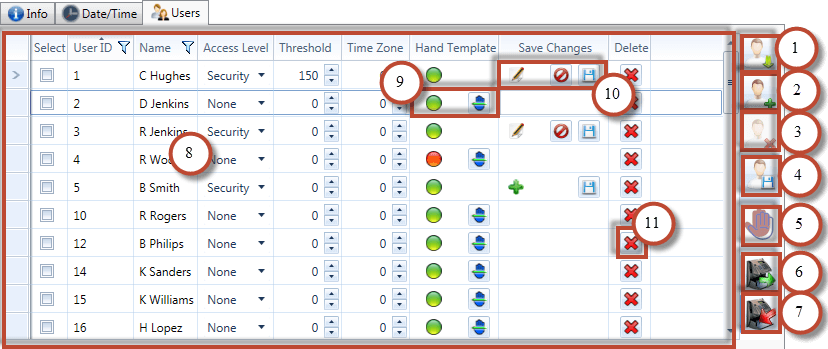
Users Tab
After you connect to the HandPunch, all users will be loaded into the Users grid below. You can delete some users from HandPunch or export all of them into a CSV file.
-
- Download Users from Device button – press this button to download all users from your HandPunch
- Add New User button – opens a new window where you can input data for a new user to be added to the device. If you already have maximum number of users that your HandPunch model can support, this button will be disabled.
-
Delete Selected Users button – deletes all users that were selected in the grid. This button is not enabled until you select at least 1 user from the list.
-
Update Users button – uploads all changes that you made to the users in the User Grid. This button is not enabled until at least one user was modified.
-
Check for duplicated hand templates button – compares hand templates of all selected users in the list and tells which users have similar hand templates. This feature can be used to identify if there are more than one user created for the same person. This action may take a long time because two users have to be sent to the reader for the comparison. For example, comparing 25 users requires 300 comparisons and can take around 4 minutes. Comparing 50 users requires 1275 comparisons and can take around 17 minutes. We suggest comparing only few users at a time.
-
Export Users to CSV – saves all users to a CSV file.
-
Import Users from CSV – loads all users from CSV file. The file format must be the same as produced by exporting users to CSV file from HandPunch Admin. This action only loads users into the grid. Existing users will be updated from the file. In order for this data to upload to the reader, you have to press Update Users button after loading all users.
- User Grid – displays list of all users. You can modify the following fields: Name, Access Level, Threshold and Time Zone. All changes that you make to users will not be uploaded until you press Update Users button.
- Hand template column – If Hand Template has been registered for the user, then you will Green marker. If there is no Hand Template registered for this user, then you will see Red marker. Register Hand Template button will initiate registration process on the HandPunch. User must be in front of the HandPunch when you press this button.
- Save Changes column – If you have modified or added new user and did not save it to HandPunch, you will see a marker here. Edit marker means something has been modified. Add marker means that you have imported user from a csv file, but did not upload it to the HandPunch yet. If user was modified, two buttons Cancel and Upload Changes will be displayed. You can then press Cancel to undo changes or Save to upload changed to the HandPunch.
- Delete button – will delete only the user where delete button was pressed.
Customization
If you like our HandPunch Admin and looking for additional features, we offer customization. We have developed projects which synchronize users between devices, automatic backup, time synchronization and more… We can integrate HandPunch Admin with your existing database or your current ERP system. Contact us to discuss how we can help you.