Main Window
Time Clock Attendance Manager consists of 2 main sections:
- Connection settings – this is where you would choose type of connection and settings to connect to your Fingerprint Reader or Card Reader.
- Attendance Log management – This is where you would see list of registrations downloaded from your Fingerprint Reader or Card Reader, you can modify registrations and save final copy to a CSV file.
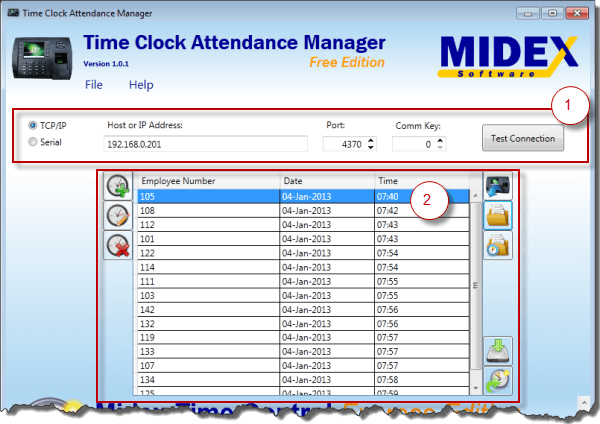
Connection Settings
You can connect to your Time Clock using TCP/IP connection or Serial Connection.

- Connection Type radio buttons – select the type of connection you are using
- Connection Settings fields – enter connection settings
- Test button – use this button after you’ve entered connection settings to test if connection with your Time Clock can be established.
Connecting to Time Clock via TCP/IP
If your Time Clock device has network card and you can connect to it via IP or Host or host address

- Host or IP Address – If your Fingerprint Reader or Card Reader is on a Local Area Network, then you need to enter its IP address into “Host or IP Address field”. If you are connecting to the Time Clock which is located in a remote location, then you need to know either a static IP of the location where the Time Clock is or host address. You can read our How To topic “How to connect to Time Clock from a remote location“.
- Port – If your Time Clock is on a Local Area Network, then you should leave Port number to its default value 4370. If your Fingerprint Reader or Card Reader is in the remote location, then you need to know the port number that was forwarded in the router to the Time Clock you are trying to connect to. You can read our How To topic “How to connect to Time Clock from a remote location“.
- Comm Key – Fingerprint Readers and Card Readers have a built-in security. You can define a Comm Key which is secret number that user must know in order to connect to your Time Clock. Default value is 0, but it is recommended to modify this value. You can read our How To topic “How to change COMM Key“.
Connect to Time Clock via Serial
If you would like to connect to Time Clock using Serial Cable, then you need to specify COM Port, Baud Rate and Device Number.
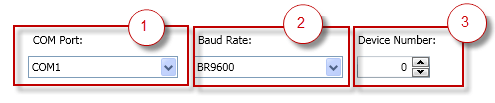
- COM Port – COM port on your computer where serial cable from Time Clock is connected
- Baud Rate – Baud rate set in the Time Clock. Default Baud Rate on Time Clock is 9600. Unless you know that is has been changed, you should leave it at 9600.
- Device Number – Address assigned to your Time Clock. You can read our How To topic “How to change Time Clock address”.
Attendance Log Management
In this window you can view all attendance logs downloaded from your Time Clock. You can add, modify and delete attendance logs and then export it to CSV file or upload it Midex Time Control Express. In addition, you can import one of the previously saved file from the program.
When user downloads logs from the Time Clock, a new csv file is created and saved in the Program Data folder. Any changes applied to the logs, does not affect this file. This way, if user made any mistake, original file can be reloaded.
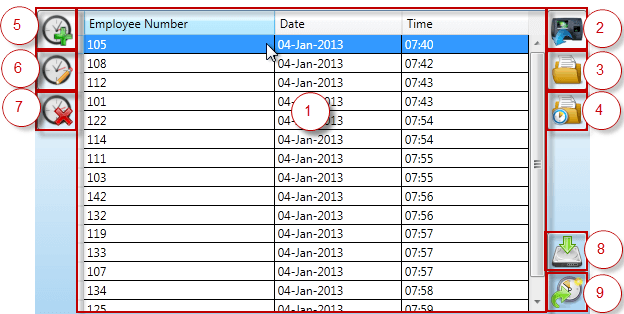
- Attendance Log grid – grid where all attendance logs downloaded from Time Clock or loaded from file are shown.
- Load from Device button – when this button is pressed, all logs are downloaded from the Time Clock. WARNING: Once logs are downloaded, they are automatically removed from the device.
- Load From File button – Opens a dialog window for the user to select the file to be loaded into the Attendnac Log grid.
- Load Original button – Opens a dialog window pointing to the folder where all csv files with orignal attendance logs are storred.
- Add Registration button – Allows user to add a manual registration.
- Edit Registration button – Allow suser to modify one of the existing registrations.
- Delete Registration button– Delete selected registrations in the grid.
- Save to File button– exports all logs shown in the grid to the CSV file.
- Upload to Midex Time Control Express button – Allows user to upload all logs directly to Midex Time Control Express. You must have created an account prior to the upload. Follow this link to create your own Midex Time Control Express account absolutely free.